哇虎!使用 Nginx 的 Naxsi 模組實現 WAF 功能
使用的環境
| 系統與使用工具 |
|---|
| Centos 7.6 |
| nginx/1.16.1 |
| Naxsi 1.3 |
一、WAF 介紹
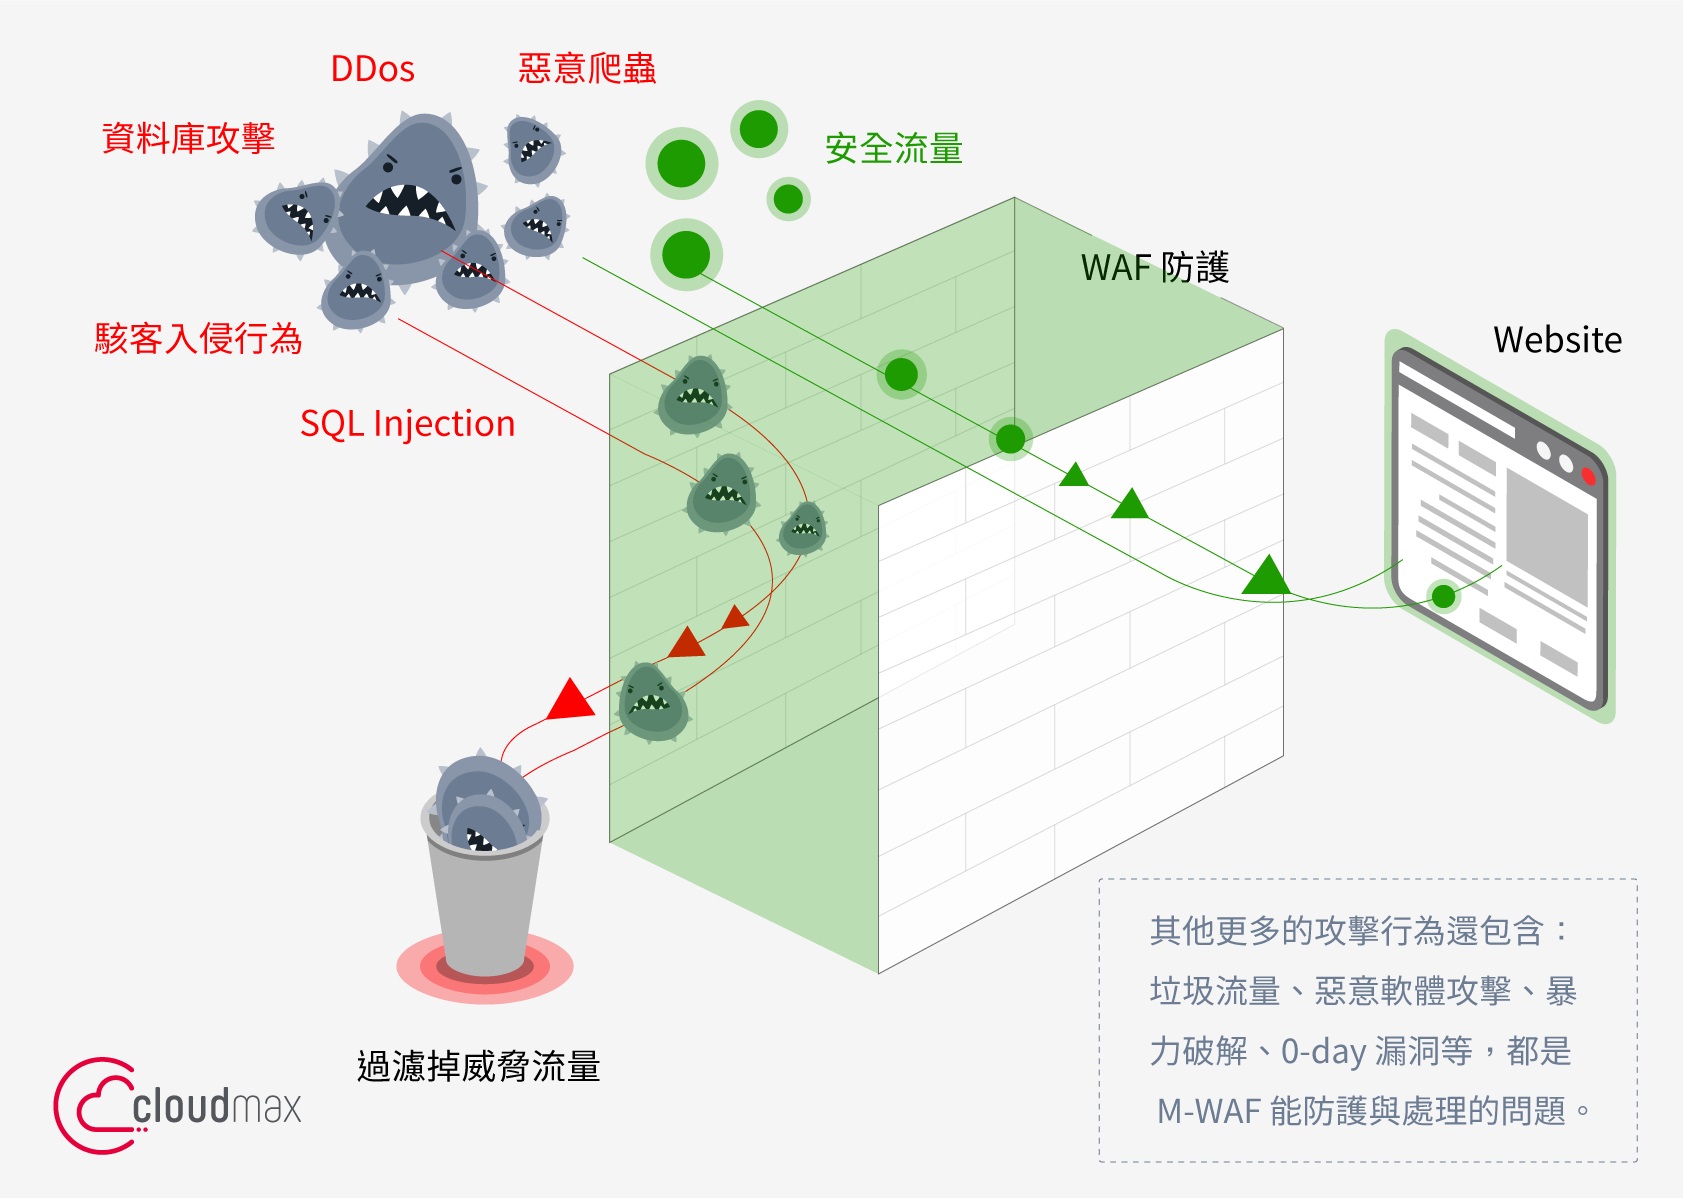
WAF(Web Application Firewall,網站應用程式防火牆),主要為保護網站應用程式,透過監控及過濾 HTTP/HTTPS 請求來分析網路行為,拒絕可疑、惡意流量進入網站,只讓安全且正常的流量通過。
只能即時保護應用程式,不能修復漏洞,但在防禦的同時,可以有緩衝時間修復應用程式的漏洞。
方式:依據事先設計好的安全政策,發掘違反安全政策的封包。
目的:保護 web 應用程式,防禦 XSS 及 SQL injection 等攻擊。
- 支持 POST/GET
- 位於網頁瀏覽者與網頁伺服器中間,專責分析與過濾 「Layer7 應用層」 的網路流量
- 有些更強大的甚至可以掃描惡意木馬文件、防竄改、伺服器優化、備份
- 如果網站有蒐集 cookie、用戶資料、表單紀錄,建議使用 WAF
 (圖片來源:cloudmax 部落格)
二、WAF 優缺點
| 優點 | 缺點 |
|---|---|
|
|
|
|
|
|
|
三、Naxsi 模組介紹
Naxsi 是 Nginx 的第三方模組,與任何 Nginx 版本都相容,採用 GPLv3 授權,可以免費使用,也不需要依賴類似防毒軟體的病毒碼資料庫。
可以建置簡易的 WAF 系統,阻擋一些常見的 Nginx Anti XSS 及 SQL Injection 攻擊,但只能過濾「GET」及「POST」的請求。
四、Naxsi 的規則檔 naxsi_core.rules
舉例 naxsi_core.rules 內的部份規則:
##################################
## SQL Injections IDs:1000-1099 ##
##################################
MainRule "rx:select|union|update|delete|insert|table|from|ascii|hex|unhex|drop|load_file|substr|group_concat|dumpfile" "msg:sql keywords" "mz:BODY|URL|ARGS|$HEADERS_VAR:Cookie" "s:$SQL:4" id:1000;
MainRule "str:\"" "msg:double quote" "mz:BODY|URL|ARGS|$HEADERS_VAR:Cookie" "s:$SQL:8,$XSS:8" id:1001;
MainRule "str:0x" "msg:0x, possible hex encoding" "mz:BODY|URL|ARGS|$HEADERS_VAR:Cookie" "s:$SQL:2" id:1002;
## Hardcore rules
MainRule "str:/*" "msg:mysql comment (/*)" "mz:BODY|URL|ARGS|$HEADERS_VAR:Cookie" "s:$SQL:8" id:1003;
MainRule "str:*/" "msg:mysql comment (*/)" "mz:BODY|URL|ARGS|$HEADERS_VAR:Cookie" "s:$SQL:8" id:1004;
MainRule "str:|" "msg:mysql keyword (|)"  "mz:BODY|URL|ARGS|$HEADERS_VAR:Cookie" "s:$SQL:8" id:1005;
MainRule "str:&&" "msg:mysql keyword (&&)" "mz:BODY|URL|ARGS|$HEADERS_VAR:Cookie" "s:$SQL:8" id:1006;
## end of hardcore rules
MainRule "str:--" "msg:mysql comment (--)" "mz:BODY|URL|ARGS|$HEADERS_VAR:Cookie" "s:$SQL:4" id:1007;
MainRule "str:;" "msg:semicolon" "mz:BODY|URL|ARGS" "s:$SQL:4,$XSS:8" id:1008;
MainRule "str:=" "msg:equal sign in var, probable sql/xss" "mz:ARGS|BODY" "s:$SQL:2" id:1009;
MainRule "str:(" "msg:open parenthesis, probable sql/xss" "mz:ARGS|URL|BODY|$HEADERS_VAR:Cookie" "s:$SQL:4,$XSS:8" id:1010;
MainRule "str:)" "msg:close parenthesis, probable sql/xss" "mz:ARGS|URL|BODY|$HEADERS_VAR:Cookie" "s:$SQL:4,$XSS:8" id:1011;
MainRule "str:'" "msg:simple quote" "mz:ARGS|BODY|URL|$HEADERS_VAR:Cookie" "s:$SQL:4,$XSS:8" id:1013;
MainRule "str:," "msg:comma" "mz:BODY|URL|ARGS|$HEADERS_VAR:Cookie" "s:$SQL:4" id:1015;
MainRule "str:#" "msg:mysql comment (#)" "mz:BODY|URL|ARGS|$HEADERS_VAR:Cookie" "s:$SQL:4" id:1016;
MainRule "str:@@" "msg:double arobase (@@)" "mz:BODY|URL|ARGS|$HEADERS_VAR:Cookie" "s:$SQL:4" id:1017;
五、Naxsi 規則與攔截分數介紹
1. 規則解說與計分方式
這是
naxsi_core.rules內的部份規則。
| 規則 | 規則解說 |
|---|---|
| id 為 1001 的規則 |
MainRule "str:\"" "msg:double quote" "mz:BODY|URL|ARGS|$HEADERS_VAR:Cookie" "s:$SQL:8,$XSS:8" id:1001; 表示如果在請求體(BODY),統一資源定位符(URL),請求參數(ARGS),請求標題(Cookie)任何地方出現了雙引號(“),就表示該請求可能是 SQL 注入或是 XSS 攻擊,判斷分數皆為 8。 |
| id 為 1002 的規則表示 |
MainRule "str:0x" "msg:0x, possible hex encoding" "mz:BODY|URL|ARGS|$HEADERS_VAR:Cookie" "s:$SQL:2" id:1002; 表示如果在請求體(BODY),統一資源定位符(URL),請求參數(ARGS),請求標題(Cookie)任何地方出現了雙引號(“),就表示該請求可能是 SQL 注入或是 XSS 攻擊,判斷分數皆為 2。 |
| id 為 1013 的規則表示 |
MainRule "str:'" "msg:simple quote" "mz:ARGS|BODY|URL|$HEADERS_VAR:Cookie" "s:$SQL:4,$XSS:8" id:1013; 表示如果在請求體(BODY),統一資源定位符(URL),請求參數(ARGS),請求標題(Cookie)任何地方出現了單引號(’),就表示該請求可能是 SQL 注入或是 XSS 攻擊,判斷分數為 4 跟 8。 |
2. 攔截分數(建立網站防護規則)
這是在
nginx.conf內的設定,最終分數可以自訂,一旦累積的分數到達設定的標準,就會攔截並回報錯誤,詳細設定方式底下介紹。
# 設定 Naxsi 何時行動,可自行調整阻擋的分數,當請求達到此分數時,請求將被拒絕
# 以下設定為當分數累積到到 8 (或 4)後就阻擋

CheckRule "$SQL >= 8" BLOCK;
CheckRule "$RFI >= 8" BLOCK;
CheckRule "$TRAVERSAL >= 4" BLOCK;
CheckRule "$UPLOAD >= 4" BLOCK;
CheckRule "$XSS >= 8" BLOCK;
六、安裝 Naxsi 模組
1. 安裝必要套件
$ yum groupinstall "development tools" -y
2. 安裝 PCRE 以及 openssl 套件
$ yum install pcre pcre-devel openssl openssl-devel -y
3. 在想要的路徑下載 Naxsi
我是安裝在 /usr/local/nginx_module 內。
$ git clone https://github.com/nbs-system/naxsi.git

4. 路徑整理
從 Github 下載的 Naxsi 位置
/usr/local/naxsi

naxsi主要資料夾
/usr/local/naxsi/naxsi_src

naxsi 規則檔
/usr/local/naxsi/naxsi_config/naxsi_core.rules
5. 編譯 Nginx
要在有 configure 的那個資料夾底下編譯,模組安裝路徑可以用絕對路徑比較保險,
使用 --add-dynamic-module 把 Naxsi 加進去。
$ ./configure --user=www --group=www \
 --prefix=/usr/local/nginx \
 --with-http_stub_status_module \
 --with-http_ssl_module \
 --with-http_v2_module \
 --with-http_gzip_static_module \
 --with-http_sub_module \
 --with-stream \
 --with-stream_ssl_module \
 --with-openssl=/root/lnmp1.6/src/openssl-1.1.1d \
 --with-openssl-opt=enable-weak-ssl-ciphers \
 --add-dynamic-module=/usr/local/nginx_module/ngx_http_geoip2_module \
 --add-dynamic-module=/usr/local/nginx_module/naxsi/naxsi_src

$ make

# 有些人說不要 make install,但我用 make module 或純粹 make 都沒有用,不知道原因
$ make install
編譯成功後長這樣:
$ nginx -V

nginx version: nginx/1.16.1
built by gcc 4.8.5 20150623 (Red Hat 4.8.5-44) (GCC)
built with OpenSSL 1.1.1d  10 Sep 2019
TLS SNI support enabled
configure arguments: --user=www --group=www --prefix=/usr/local/nginx --with-http_stub_status_module --with-http_ssl_module --with-http_v2_module --with-http_gzip_static_module --with-http_sub_module --with-stream --with-stream_ssl_module --with-openssl=/root/lnmp1.6/src/openssl-1.1.1d --with-openssl-opt=enable-weak-ssl-ciphers --add-dynamic-module=/usr/local/nginx_module/ngx_http_geoip2_module --add-dynamic-module=/usr/local/nginx_module/naxsi/naxsi_src

6. 將 Naxsi 主要設定檔複製進 Nginx 資料夾中
$ cp /usr/local/nginx_module/naxsi/naxsi_config/naxsi_core.rules /usr/local/nginx/conf
7. 新增一個 Naxsi 規則檔案
這是上面攔截分數把他包成一個檔案 naxsi_custom.rules,到時候再 include 到 nginx.conf 裡面。
底下設定在上面第 2 節有介紹。
$ vim /usr/local/nginx/conf/naxsi_custom.rules
# 開啟 naxsi
SecRulesEnabled;

# 學習模式 預設關閉
#LearningMode;

# 透過 libinjection 判斷 SQL 注入和 XSS 攻擊
LibInjectionSql;
LibInjectionXss;

# 拒絕訪問時展示的頁面
DeniedUrl "/RequestDenied";

# 設定 Naxsi 何時行動,可自行調整阻擋的分數,當請求達到此分數時,請求將被拒絕
# 以下設定為當分數累積到到 8 (或 4)後就阻擋
CheckRule "$SQL >= 8" BLOCK;
CheckRule "$RFI >= 8" BLOCK;
CheckRule "$TRAVERSAL >= 4" BLOCK;
CheckRule "$UPLOAD >= 4" BLOCK;
CheckRule "$XSS >= 8" BLOCK;

# Naxsi 的 log 位置設定
error_log /home/wwwlogs/naxsi_attach.log;

8. 開始設定
(1) nginx.conf
$ vim /usr/local/nginx/conf/nginx.conf
裡面設定:
# 在全區塊 pid 下面新增這句:
load_module modules/ngx_http_naxsi_module.so;

# 在 http include rules
http
  {
    include /usr/local/nginx/conf/naxsi_core.rules;
  }


# 在 server include rules
server
  {
  location /
      {
        include /usr/local/nginx/conf/naxsi_custom.rules;
      }

  location /RequestDenied  # 要搭配上面的 DeniedUrl "/RequestDenied";
      {
        return 400; # 被阻擋後顯示錯誤 400
      }
  }


(2) vhost.conf
$ vim /usr/local/nginx/conf/vhost/xxx.conf
裡面設定:
server
  {
  location /
      {
        include /usr/local/nginx/conf/naxsi_custom.rules;
      }

  location /RequestDenied  # 要搭配上面的 DeniedUrl "/RequestDenied";
      {
        return 400; # 被阻擋後顯示錯誤 400
      }
  }

9. 重新啟動或重新讀取 Nginx
# 重新啟動 nginx
$ nginx -s reopen

# 重新讀取 nginx
$ nginx -s reload
七、實際測試
1. 瀏覽器上測試
在有設定 Naxsi 的網站上面打這些 SQL 注入的請求:
http://url/=<>
http://url/?a=<>
http://localhost/?...<>
http://localhost/?id=<>
2. 主機上測試
在終端機上面存取有設定 Naxsi 的網站:
$ curl -IL "http://x.x.x.x/?a=<>"
$ wget "https://xxx.xxx.com/?<>"
八、攔截成功畫面與分析
1. 當下攔截畫面
觀察網站收到 SQL 注入的請求後有沒有報400。


2. 攔截 log 查看

3. log 分析
查看設定的 naxsi_attach.log,若在 log 中出現 NAXSI_FMT 開頭,就是啟用成功。
挑 2022/10/20 17:53:37 那行 log 來當範例(IP 跟網址有改過)。
2022/10/20 17:53:37 [error] 7275#0: *5428 NAXSI_FMT: ip=223.58.42.103&server=taipei.test.com&uri=/=a<>&vers=1.3&total_processed=20&total_blocked=3&config=block&cscore0=$XSS&score0=8&zone0=URL&id0=1302&var_name0=, client: 223.58.42.103, server: taipei.test.com, request: "GET /=a%3C%3E HTTP/2.0", host: "taipei.test.com"
且對應到的規則是以下兩行:
########################################
## Cross Site Scripting IDs:1300-1399 ##
########################################
MainRule "str:<" "msg:html open tag" "mz:ARGS|URL|BODY|$HEADERS_VAR:Cookie" "s:$XSS:8" id:1302;
| log | log 分析 |
|---|---|
| NAXSI_FMT | 2022/10/20 17:53:37 [error] 7275#0: *5428 NAXSI_FMT |
| 對方IP | ip=223.58.42.103& |
| 請求的主機名 | server=taipei.test.com& |
| uri | uri=/=a<>& |
| Naxsi 版本 | vers=1.3& |
| 總共請求 20 次 | total_processed=20& |
| 總共阻擋 3 次 | total_blocked=3& |
| 設定:攔截 | config=block& |
| 分數標籤:XSS | cscore1=$XSS& |
| XSS分數 | score1=8& |
| 符合的區域 | zone0=URL& |
| 符合的規則 id | id0=1302& |
| 符合的變數 | var_name0= , |
| 對方 IP | client: 223.58.42.103, |
| server=taipei.test.com, | |
| 請求內容 | request: “GET /=a%3C%3E HTTP/2.0”, |
| host: “taipei.test.com” |
九、(額外)開啟 NAXSI_EXLOG
開啟 NAXSI_EXLOG,可以記錄具體觸發 Naxsi 攔截規則的請求內容,內容紀錄正常和異常的請求,方便後續分析攔截的是攻擊請求還是誤判。
| log | log 分析 |
|---|---|
| NAXSI_FMT(原本就有) | 僅包含 ID 和異常的位置 |
| NAXSI_EXLOG | 提供了實際的內容,可以輕鬆確認它是否為誤報 |
1. NAXSI_EXLOG 設定
在 conf 檔裡的 server 部分新增設定:
$ vim /usr/local/nginx/conf/vhost/xxx.conf

$ vim /usr/local/nginx/conf/nginx.conf
裡面設定:
server
  {
    set $naxsi_extensive_log 1;
  }
2. NAXSI_EXLOG 的 log 畫面
會多出現一個 NAXSI_EXLOG,就表示開啟成功。

十、(額外)將 Naxsi 加入 Fail2ban
1. Fail2ban 新增 Naxsi 過濾器
filter 的 conf 名稱可以自訂。
$ vim /etc/fail2ban/filter.d/nginx-naxsi.conf
[INCLUDES]
before = common.conf

[Definition]
failregex = NAXSI_FMT: ip=<HOST>&server=.*&uri=.*&learning=0
            NAXSI_FMT: ip=<HOST>.*&config=block
ignoreregex = NAXSI_FMT: ip=<HOST>.*&config=learning
2. Fail2ban 主要設定檔設定
$ vim /etc/fail2ban/jail.local
[nginx-naxsi]
enabled = true
filter = nginx-naxsi
action = iptables-multiport[name=nginx-naxsi, port="http,https", protocol=tcp]
logpath = /home/wwwlogs/naxsi_attach.log
maxretry = 6
bantime = -1 # 封鎖一輩子!
十一、(額外)白名單
Naxsi 社區提供一些常用的白名單規則,例如:wordpress。
然後將規則 include 到 server 內的 location,重啟 nginx 即可,
不過要注意一些這些白名單的修改日期,有些太老。